
Do you want to allow your customers to use their vanity domain with your product? We are in the same situation as you and discovered the optimal solution for our upcoming SaaS product that might solve your problem too.
The idea is as simple: Cloudflare is responsible for everything around the security, performance, and reliability of your web application, including the crucial SSL/TLS part, and Fly.io runs your application with its uncomplicated and excellent scalability. The setup looks like this:

As of 07 October 2022, the free, pro, and business plans allow up to 5000 custom hostnames, with 100 custom hostnames being free (2$ per hostname).
Note: We are recommending using a separate domain to host customer applications. In other words, our dashboard runs on a separate domain from our customer’s application (enhancing security).
Summary
- Fly.io custom domains and SSL certificates don’t work with Cloudflare custom hostnames. We decided to solve this issue by moving the SSL/TLS termination to our application code (Nginx with Cloudflare origin certificates) instead of using Fly.io.
- Adding Cloudflare custom hostnames with the HTTP verification method works like a charm, but your clients will still need to verify domain ownership.
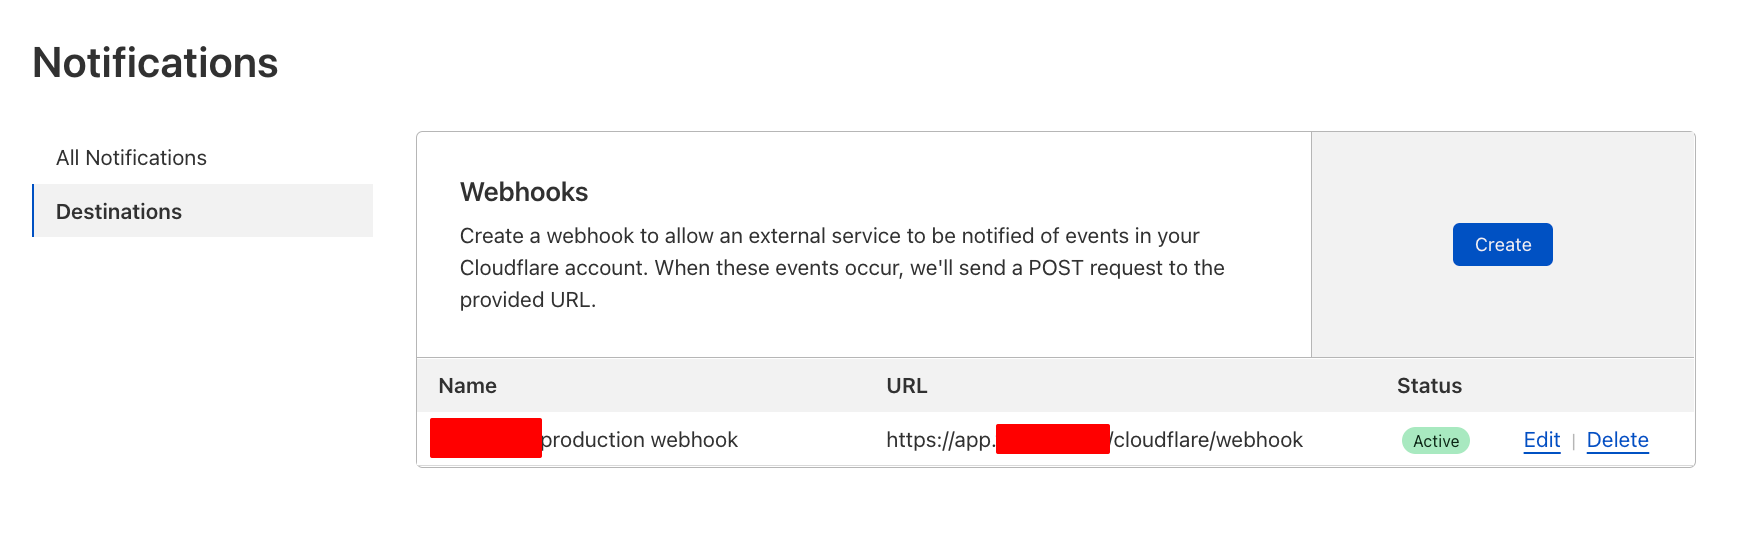
- You can use Cloudflare webhook notifications instead of cronjobs to listen to state changes. We are using it to display a customer’s domain’s current status (e.g., SUCCESS when Cloudflare reports the domain as active).
Setup
This setup assumes that you use Laravel with the default fly launch setup.
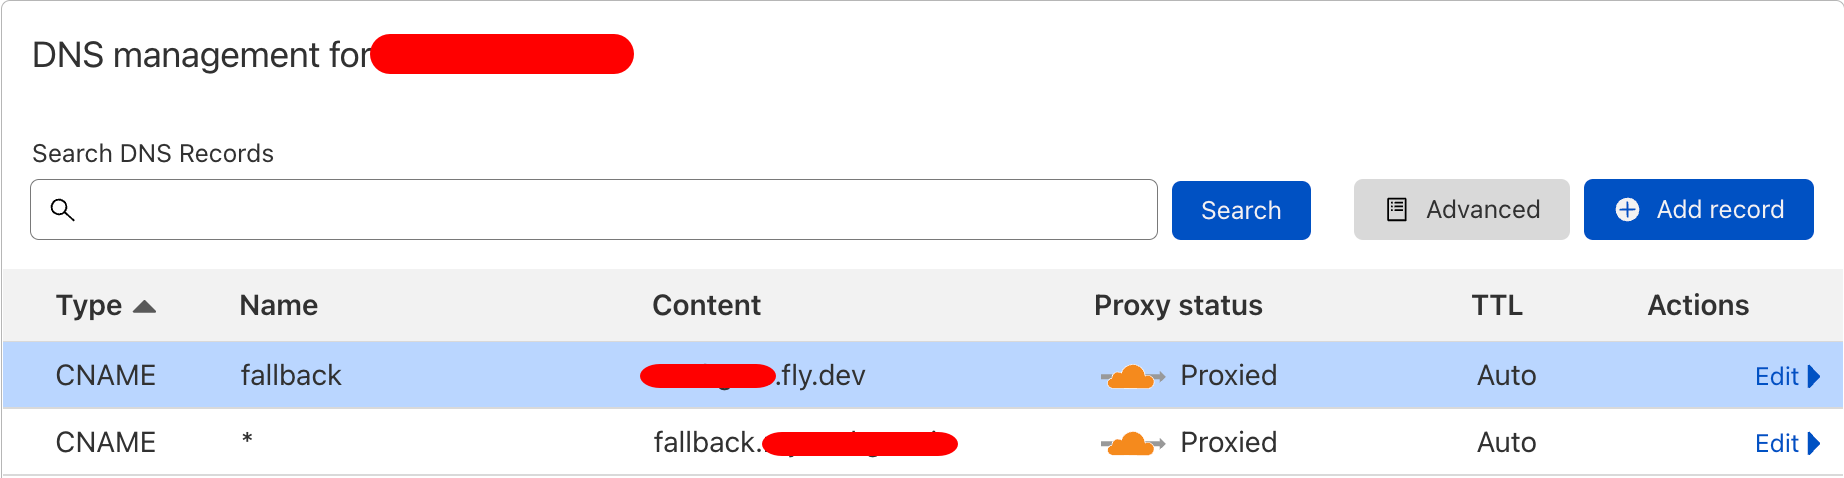
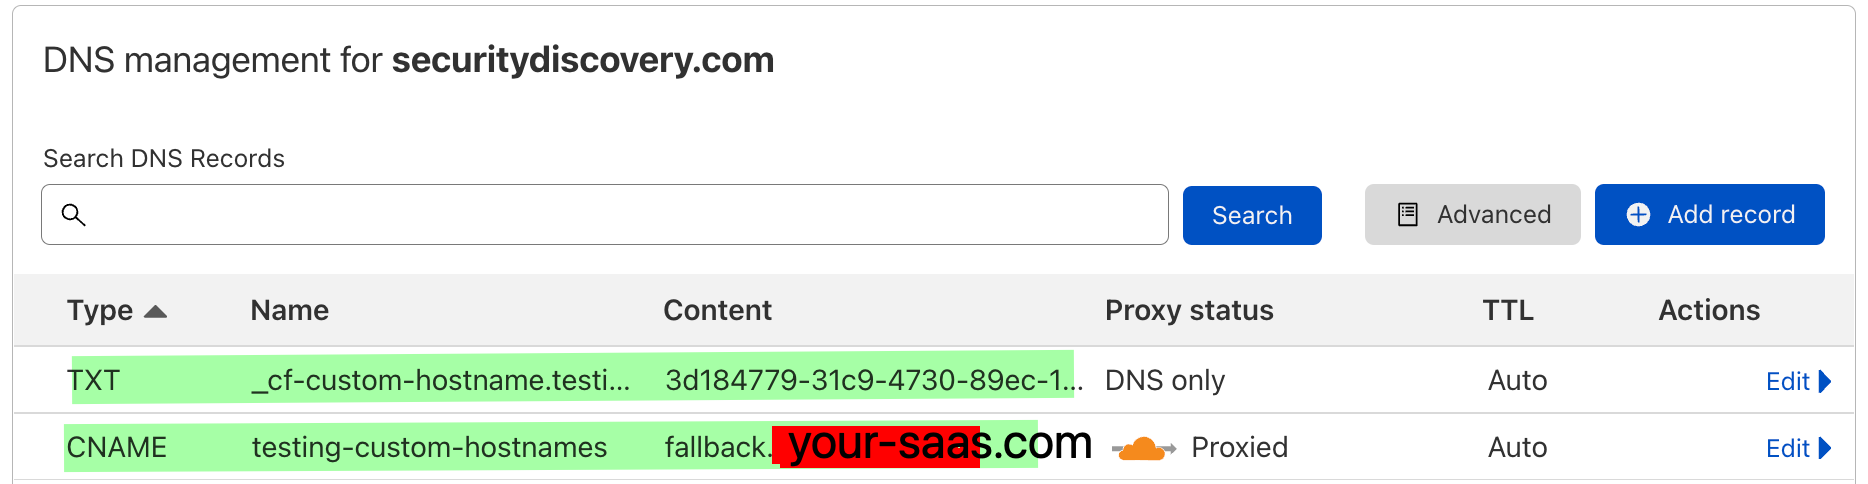
1. Add your “fallback” DNS record in “DNS management”, pointing to your Fly.io application. We favored the CNAME type.
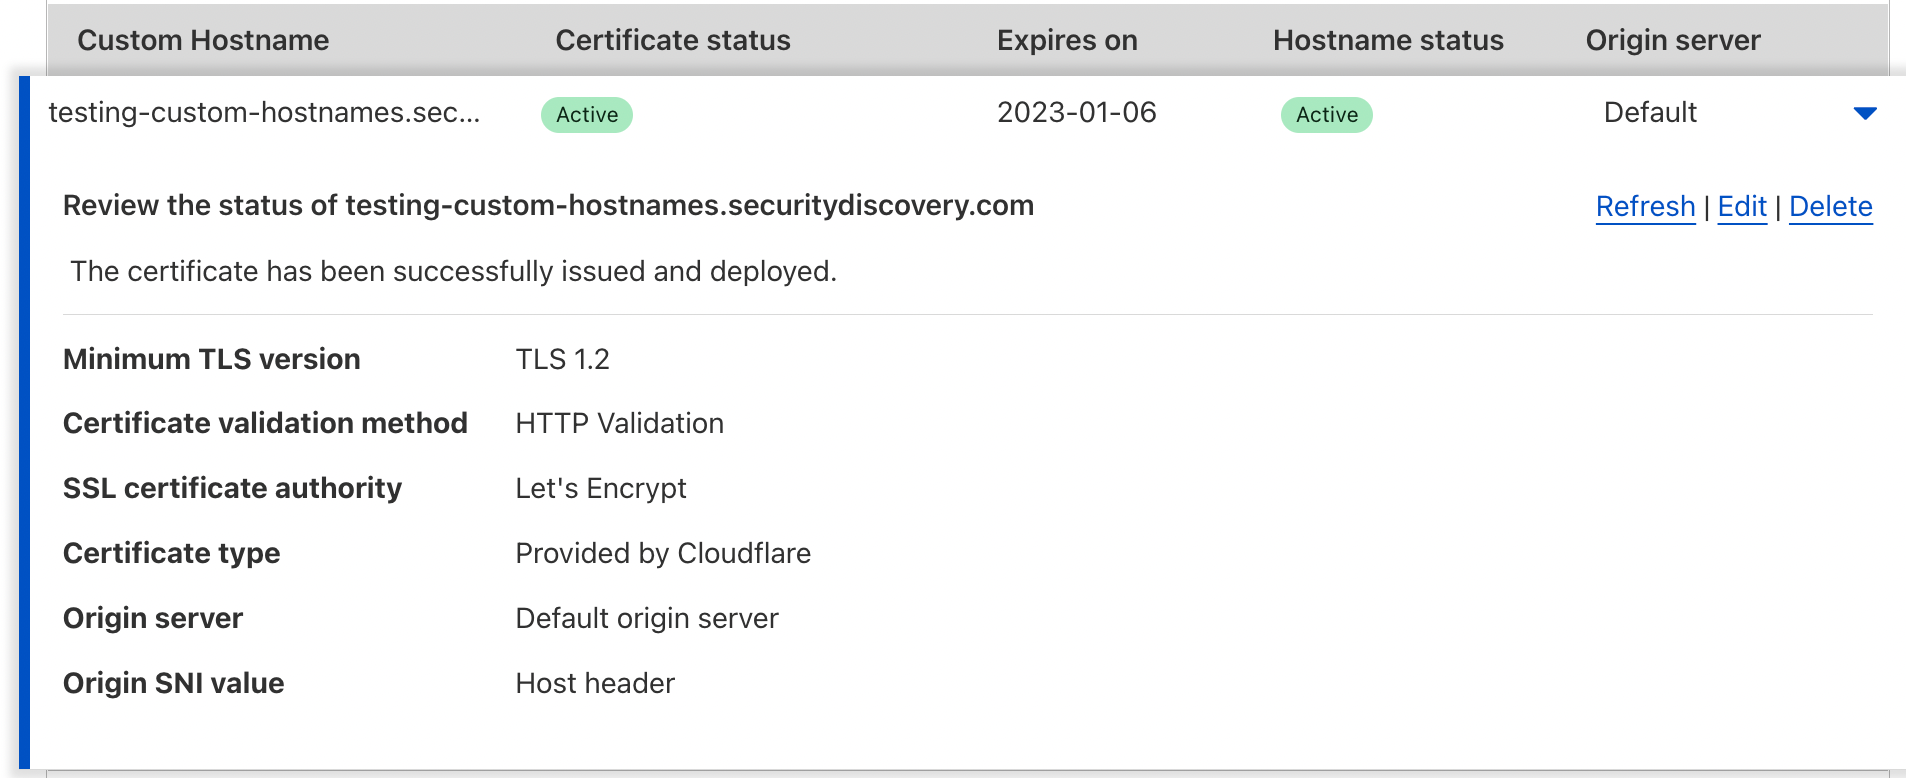
2. Navigate to “SSL/TLS”, “Custom Hostnames” and set the fallback origin.

3. We could not use Fly.io’s custom domains and SSL certificates with Cloudflare. Therefore, we modified the default Fly.io configuration to use our Nginx back-end for SSL/TLS termination instead of the Fly.io inbuilt solution.
 [[services]]
   http_checks = []
-  internal_port = 8080
+  internal_port = 8443
   processes = ["app"]
   protocol = "tcp"
   script_checks = []
   [services.concurrency]
     hard_limit = 25
     soft_limit = 20
     type = "connections"

   [[services.ports]]
-    handlers = ["tls", "http"]
+    handlers = [] # SSL/TLS termination in our app with nginx
     port = 443
4. Navigate to SSL/TLS, Origin Server. Create a new origin certificate with the “Create Certificate.” Download the certificate and provision them to your application. We have chosen the fly secrets method. We base64-encoded the certificates for simplicity.
cat certificate.pem|base64
cat certificate.key|base64

flyctl secrets set SSL_KEY="LONG_BASE64_ENCODED_KEY=="
flyctl secrets set SSL_CERT="LONG_BASE64_ENCODED_CERT=="
5. Add your SSL certificates on startup.
#!/usr/bin/env sh

if [ $# -gt 0 ];then
    # If we passed a command, run it as root
    exec "$@"
else
    # Otherwise start the web server
+   mkdir -p /etc/ssl
+   echo "$SSL_KEY" |base64 -d >> /etc/ssl/nginx.key
+   echo "$SSL_CERT" |base64 -d >> /etc/ssl/nginx.crt

    ## Prepare Laravel caches
    /usr/bin/php /var/www/html/artisan config:cache --no-ansi -q
    /usr/bin/php /var/www/html/artisan route:cache --no-ansi -q
    /usr/bin/php /var/www/html/artisan view:cache --no-ansi -q
    chown -R webuser:webgroup /var/www/html

    exec /init
fi
6. Modify your Nginx configuration to use the Cloudflare SSL certificates. Note: the code below is not showing our full Nginx configuration, but the crucial part; listening on port 8443 for SSL and adding the SSL certificate with ssl_certificate and ssl_certificate_key.
server {
    listen 8443 ssl default_server;
    listen [::]:8443 ssl default_server;

    ssl_certificate /etc/ssl/nginx.crt;
    ssl_certificate_key /etc/ssl/nginx.key;

    # ADD own SSL config or move that to http block?
    #ssl_protocols          TLSv1.3;

    # OCSP Stapling
    #ssl_stapling           on;
    #ssl_stapling_verify    on;
# ...
}
7. Deploy your app
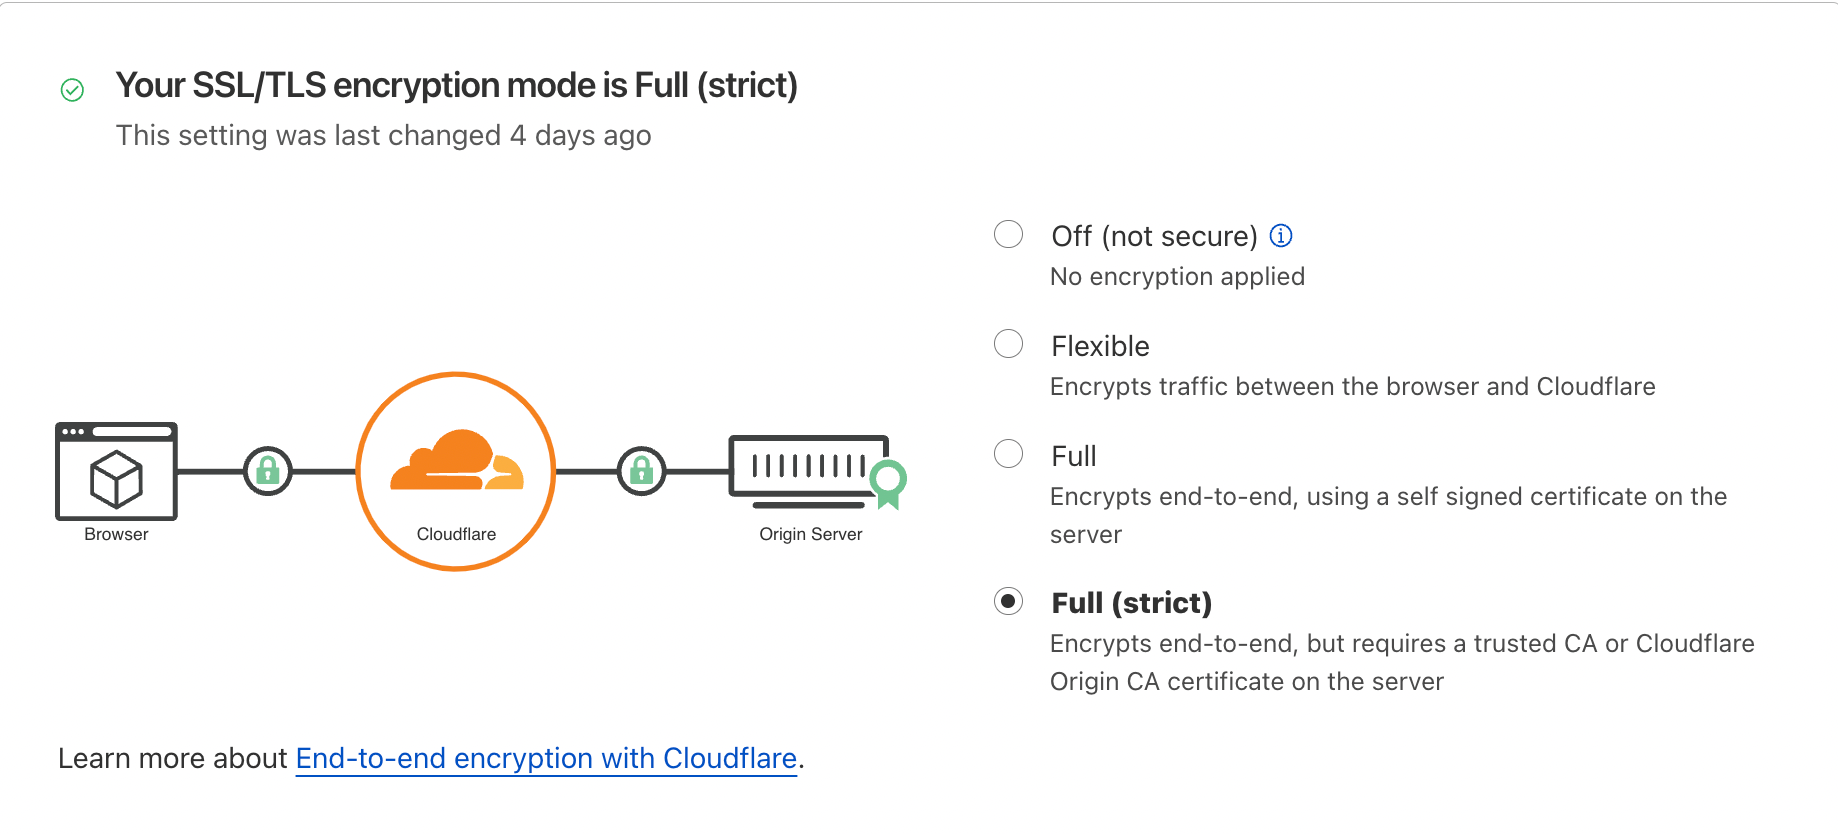
flyctl deploy8. Change your SSL/TLS encryption mode to Full (strict). NOTE: That might break your site if you have other subdomains that are not correctly SSL/TLS secured. In our case, all subdomains route to Fly.io with our Cloudflare certificate, so nothing broke for us.
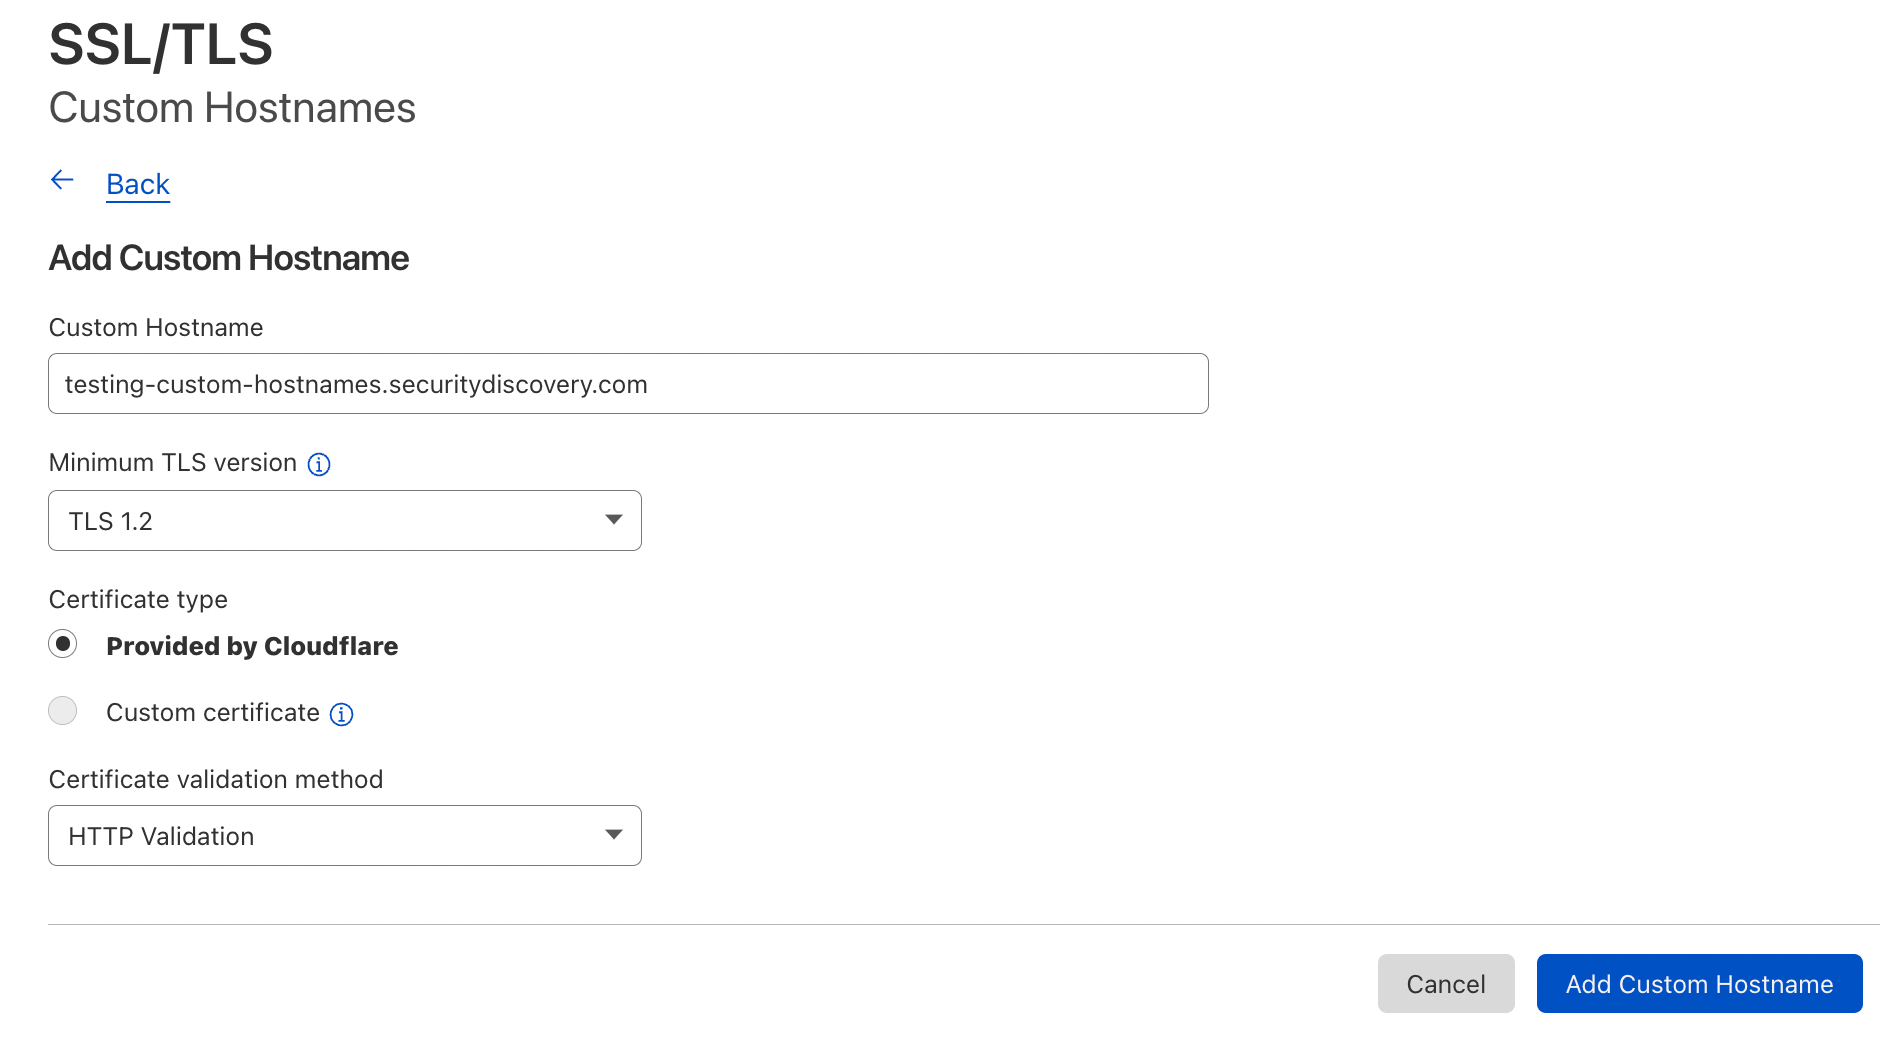
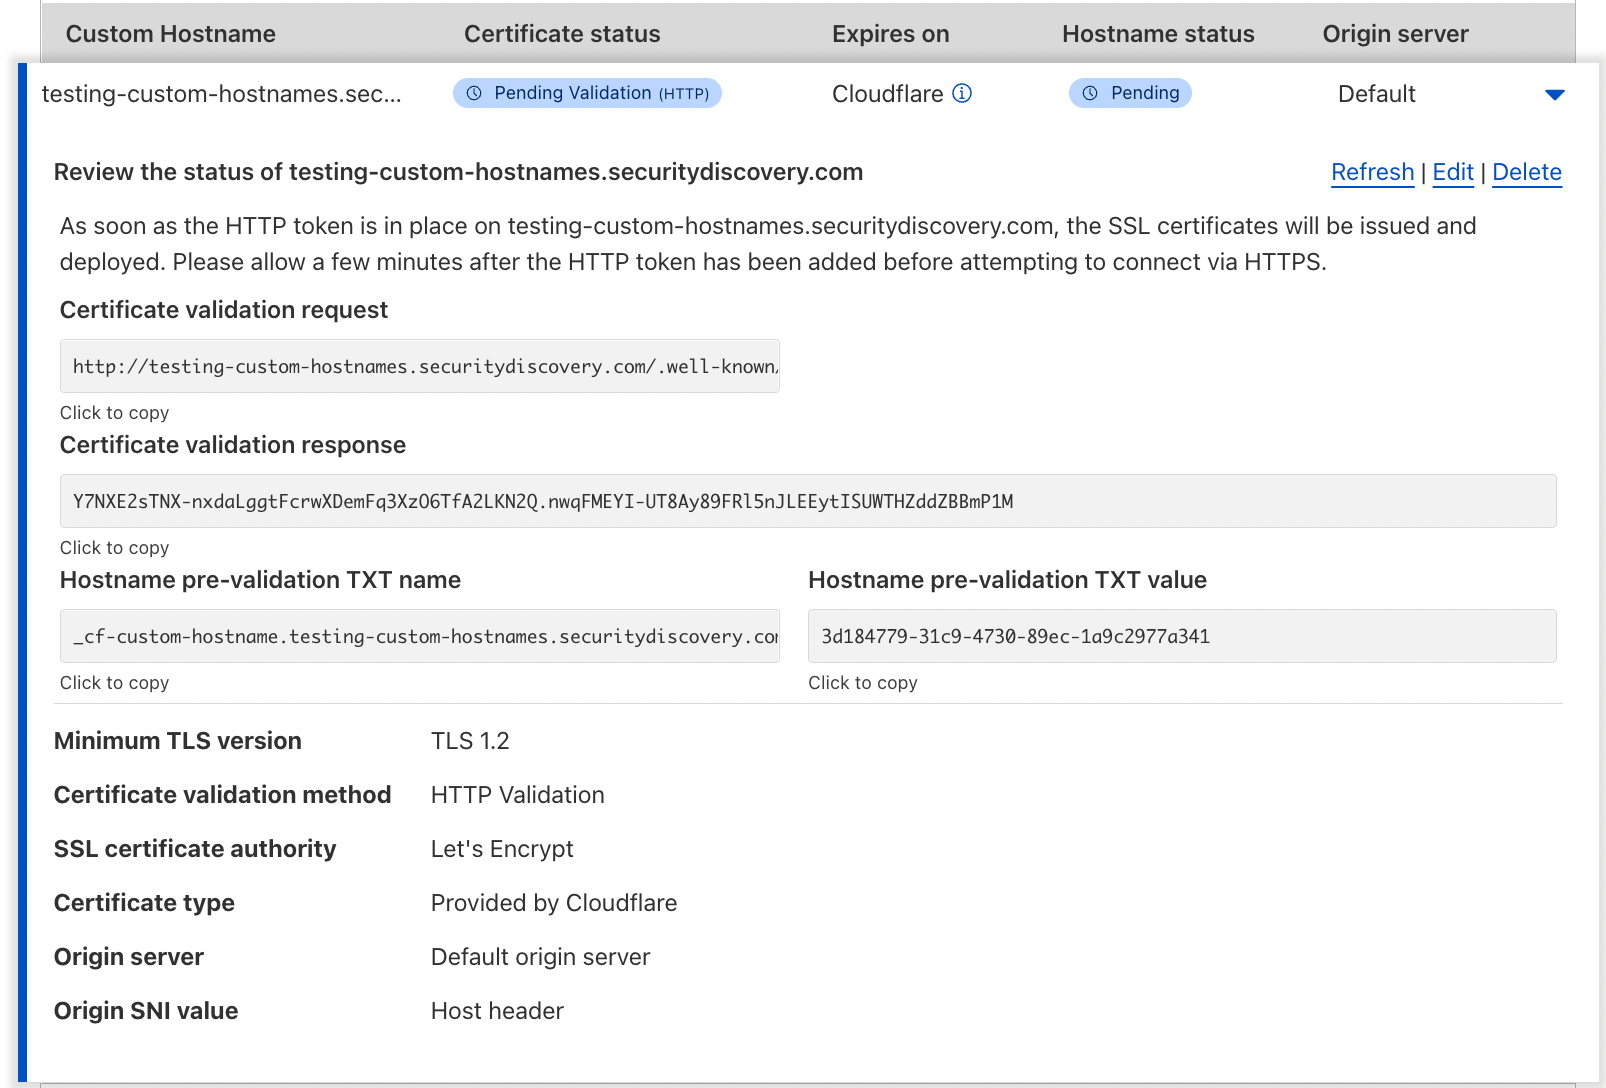
9. Test the integration by adding your first “customer” through the Cloudflare dashboard. We own multiple domains and used our non-SaaS domain to test the integration. After adding our domain, you can see in the second image that Cloudflare requires us to verify the ownership by adding TXT entries to the DNS. You will need to show these values to your customers.
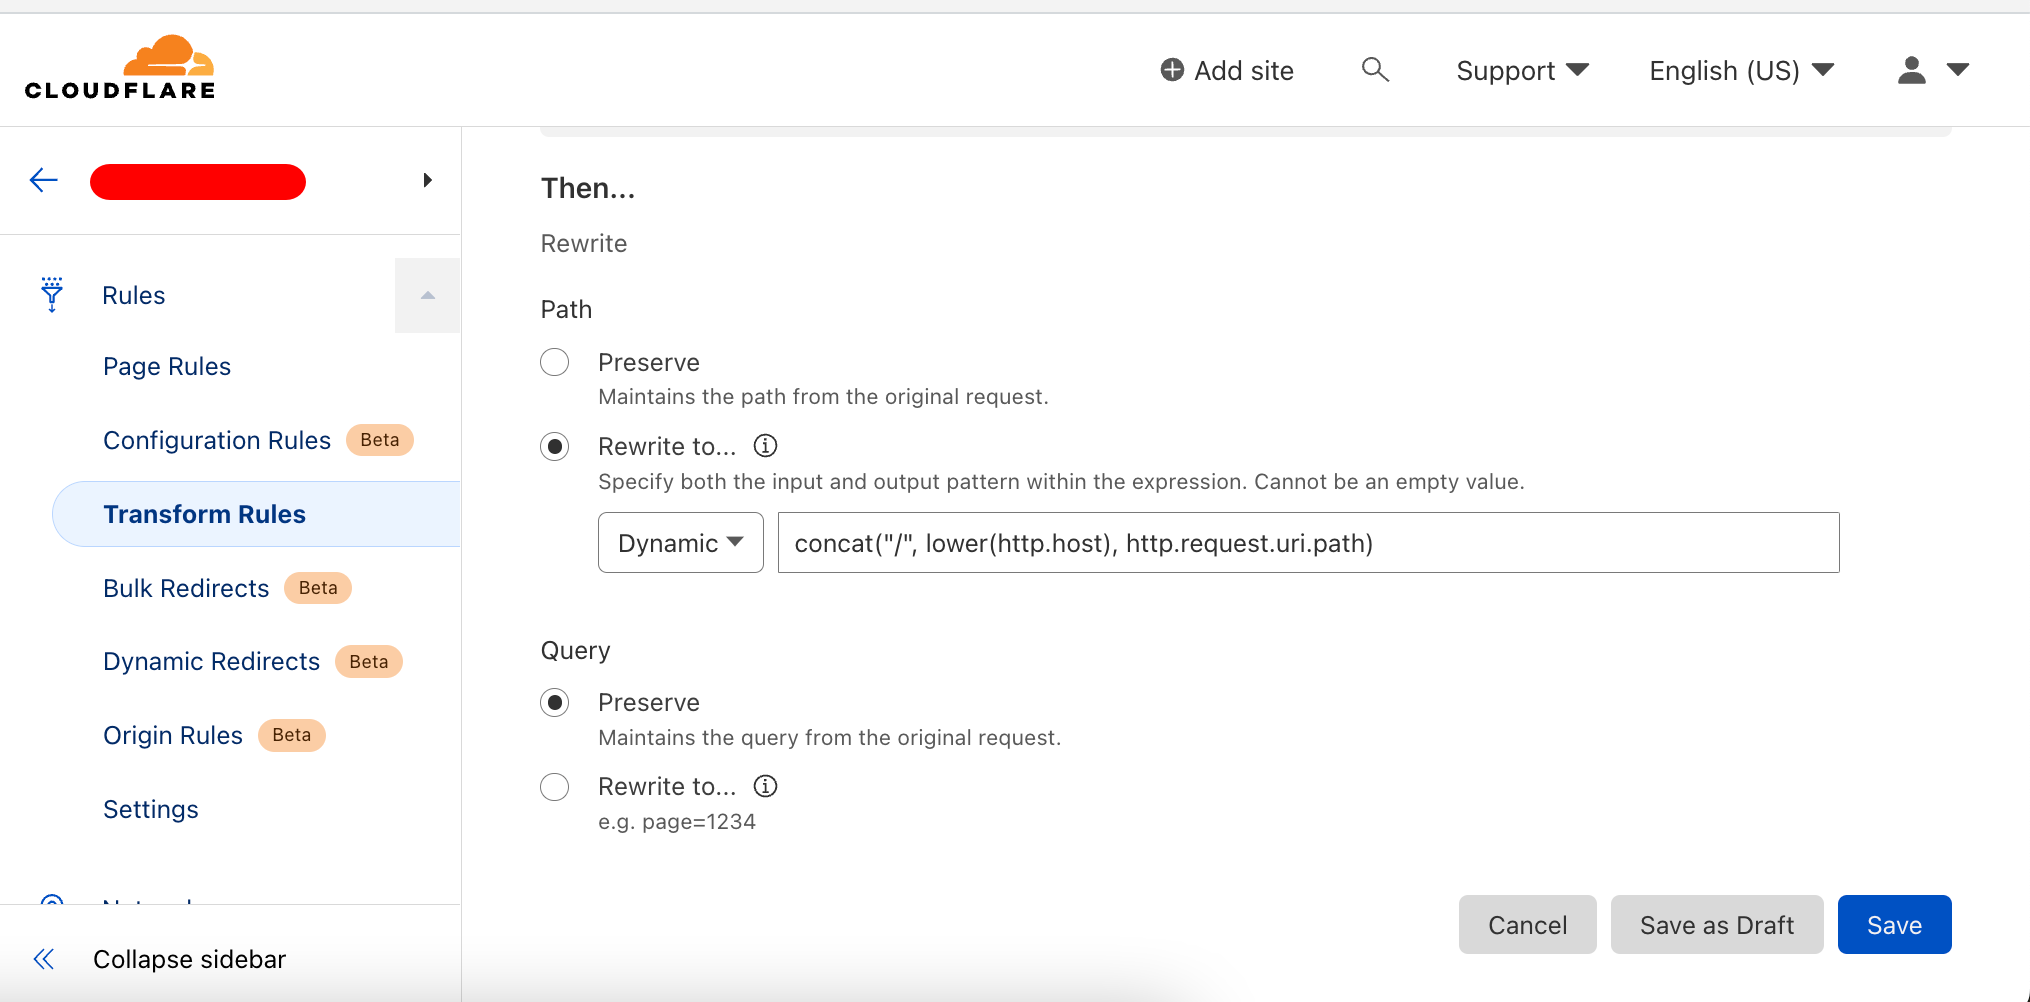
10. Optional: We decided to identify our customers not through the host header but through the request path. We configured CloudFlare to transform the request URL:
(
    not starts_with(http.request.uri.path, "/js/") and
    not starts_with(http.request.uri.path, "/css/") and
    not starts_with(http.request.uri.path, "/vendor/") and
    not starts_with(http.request.uri.path, "/img/") and
    http.request.uri.path ne "/favicon.ico" and
    http.request.uri.path ne "/robots.txt"
)
We configured the above expressions to allow static assets like JavaScript files required by Laravel Livewire to load (no transformation). In other cases, the following transformation occurs:
concat("/", lower(http.host), http.request.uri.path)Example:
   https://subdomain.tenant.com/js/app.js
-> https://subdomain.tenant.com/js/app.js

   https://subdomain.tenant.com/rest-of-url/test
-> https://subdomain.tenant.com/subdomain.tenant.com/rest-of-url/test
This enables us to implement painless routing in our Laravel application:
// at the end of the file -> don't break other routes
Route::group(['prefix' => '{domain}'], function () {
    // /blabla.customer.com/
    Route::get('/', function (Team $team_by_domain) {
        dd($team_by_domain);
    });
    // e.g. /blabla.customer.com/test
    Route::get('/test', function (Team $team_by_domain) {
        // do something with the $team_by_domain
        return "tenant-domain";
    });
});
public function boot()
{
// ...
Route::bind('domain', function ($value) {
return Team::where('domain', '=', $value)
->where('domain_validated', true)
->firstOrFail();
});
// ...
}As shown above, we add a new Route Model Binding and use it to inject the Team model instance directly into our routes.
11. Try the new custom hostname!

12. TODO: Implement proper domain registration in the code! To give an idea, we started with the following code (which will very likely drastically change):
CLOUDFLARE_ZONE="YOUR_SAAS_ZONE_ID"
CLOUDFLARE_API_KEY="YOUR_CLOUDFLARE_API_TOKEN"
CLOUDFLARE_WEBHOOK_SECRET="A_GOOD_WEBHOOK_SECRET"
composer require cloudflare/sdk<?php
namespace App\Jobs;
use App\Models\Team;
use Cloudflare\API\Adapter\Guzzle;
use Cloudflare\API\Auth\APIToken;
use Cloudflare\API\Endpoints\CustomHostnames;
use Illuminate\Bus\Queueable;
use Illuminate\Contracts\Queue\ShouldQueue;
use Illuminate\Foundation\Bus\Dispatchable;
use Illuminate\Queue\InteractsWithQueue;
use Illuminate\Queue\SerializesModels;
use Illuminate\Support\Carbon;
class AddCloudflareHostname implements ShouldQueue
{
use Dispatchable, InteractsWithQueue, Queueable, SerializesModels;
public Team $team;
/**
* Create a new job instance.
*
* @return void
*/
public function __construct(Team $team)
{
$this->team = $team->withoutRelations();
}
/**
* Execute the job.
*
* @return void
*/
public function handle()
{
$key = new APIToken(env('CLOUDFLARE_API_KEY'));
$adapter = new Guzzle($key);
$customHostnames = new CustomHostnames($adapter);
$result = $customHostnames->addHostname(
zoneID : env('CLOUDFLARE_ZONE'),
hostname : $this->team->domain,
sslSettings: [
'min_tls_version' => '1.2',
'tls_1_3' => 'on',
'http2' => 'on',
'early_hints' => 'on',
],
);
$this->team->update([
'domain' => $result->hostname,
'domain_id' => $result->id,
'domain_verification' => $result->ownership_verification->value,
'domain_updated_at' => Carbon::now(),
]);
$this->team->save();
}
}We are still working on the implementation. Cloudflare provides notifications that we will use to change the domain_verification field to active when we get an “active status” callback. See below, but keep in mind this is incomplete code.

Route::post(
    '/cloudflare/webhook',
    [CloudflareWebhookController::class, 'handleWebhook']
);
<?php
namespace App\Http\Controllers;
use App\Models\Team;
use Carbon\Carbon;
use Illuminate\Http\Request;
use Symfony\Component\HttpKernel\Exception\AccessDeniedHttpException;
class CloudflareWebhookController extends Controller
{
/**
* Handle CloudFlare webhooks
*
* @throws \Throwable
*/
public function handleWebhook(Request $request)
{
// @TODO testing, proper validation & edge-case handling
throw_if(env('CLOUDFLARE_WEBHOOK_SECRET') === null, new \Error('internal error'));
throw_if(
$request->header('cf-webhook-auth') != env('CLOUDFLARE_WEBHOOK_SECRET'),
new AccessDeniedHttpException(
'Invalid CloudFlare Webhook secret',
)
);
$event = $request->json();
$eventType = data_get($event, '.metadata.event.type', '');
if (! str_starts_with($eventType, 'ssl.custom_hostname_certificate')) {
return response()->json(['msg' => 'event not registered']);
}
$domain_id = data_get($event, '.data.id', '');
$status = data_get($event, '.data.ssl.status', '');
$team = Team::where('domain_id', '=', $domain_id)->firstOrFail();
$team->domain_validated = $status === 'active';
$team->domain_updated_at = Carbon::now();
$team->save();
return response()->json(['msg' => 'ok!']);
}
}